Test and Measurement Technical Data
Automating dScope Series III from LabVIEW 2013
Automating dScope Series III from LabVIEW is as easy as any other automation in LabVIEW. The dScope exposes all its automation capabilities as ActiveX controls which LabVIEW can access directly. This means that very nearly everything you can do from dScope directly can be automated from LabVIEW. The key is to let LabVIEW know where to look and then it can give you all the dScope methods and properties in a hierarchical tree structure, allowing you to browse the literally hundreds of controls of the dScope object.
Step by Step
What follows is a fairly low level, step by step guide to getting the dScope up and running to the point that you can make use of it from LabVIEW 2013. We'll start from the assumption that you've got LabVIEW 2013 installed and working and have already got a VI up and running that you want to use the dScope in, but we'll assume very little about your knowledge of the LabVIEW or ActiveX controls so this will be very much step by step - apologies to those who are familiar with LabVIEW and ActiveX - for you the two main things you'll need to know are:- Use the dScope.exe for the ActiveX reference as all the controls are embedded in it.
- Run the dScope software at least once "as administrator" so that it can register its automation interfaces
1) Open an ActiveX automation interface
- From the block-diagram, right click to open the "Functions" panel
- From the "Connectivity" -> "ActiveX" section, drag "Automation Open" out onto your block diagram so you have something like the below:
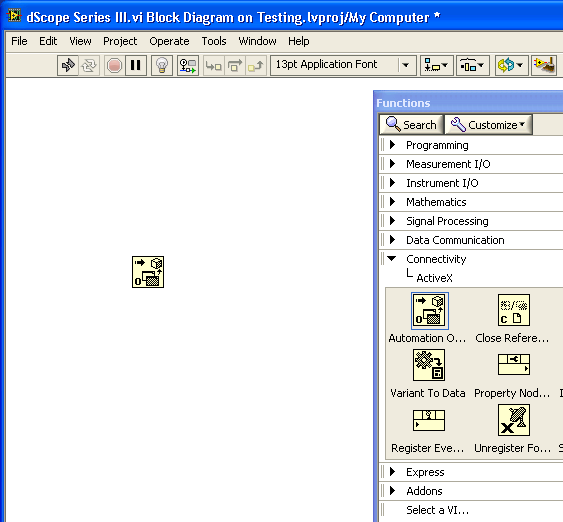
Figure 1: ActiveX "Automation Open"
2) Connect to dScope
The next stage is to define which automation interface this is to open. To do this, we have to tell LabVIEW where to find it.- Right click on the newly created "Automation Open" icon in your block diagram
- From the context menu, go to "Select ActiveX Class" -> "Browse"
- Depending on what other interfaces are defined, this list might already include other ActiveX controls.
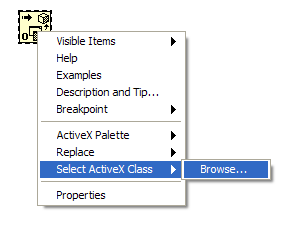
Figure 2: Select the ActiveX Class
- This will open the "Select Object from Type Library" dialogue (as below), but the dScope control we want will not be in there
- Click the "Browse" button - a standard Windows Explorer window will open
- In the "Files of Type" drop-list at the bottom, select "All Files (*.*)"
- Navigate to the dScope executable which is typically "c:\Program Files\Prism Sound\dScope Series III\DScope.exe" and select it
- The "Select Object from Type Library" dialogue should now show "dScope Series III Version 1" as below:
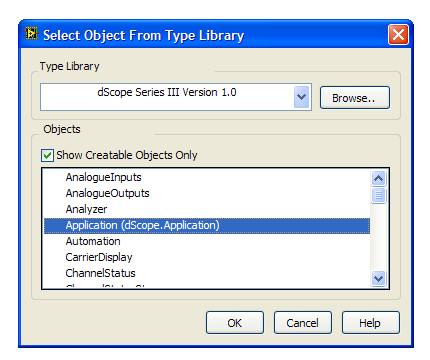
Figure 3: Select the dScope Application
- Select "Application (dScope.Application)" from the list at the bottom and click "OK"
- The block diagram should now show a reference to "DScope.IDScope" as below:

Figure 4: dScope Interface Reference
- At this point we should have a working reference to the dScope object and running this VI should open the dScope software. It will not, however, be very useful to us yet and there are several other steps needed to make it usable.
3) Wait for the dScope to initialise
Before we can make use of the dScope, we have to wait for the dScope hardware and software to initialise. This takes several seconds if the dScope hardware is off and the software is not running. If the dScope is already running, it takes only a very short time. In order to determine whether the dScope is ready, we make use of the "IsInitialised" method which returns "True" if the dScope is ready and "False" otherwise. We will use a "while" loop to wait until it returns true.- From the "Function" menu, in the "Connectivity" -> "ActiveX" section, drag "Invoke Node" out onto your block diagram
- Hover your cursor over the top right of the "Automation Open" box so that the "wire" tool appears then clcik and drag over to the top left of the "Invoke Node" box to "wire" the two together as below:
- This links the Automation Reference Number (RefNum) so that LabVIEW now knows what ActiveX control we are referring to and the top half will now say "IDscope":

Figure 5: Adding a node
- Right click on the newly added node, and go to "Select Method" from the context menu
- A long list of the methods of the dScope object will appear - select "IsInitialised"
- Next we need to create a while loop. From the "Function" menu in the "Programming" -> "Structures" section, click on the "While Loop"
- Drag this to create a loop that encloses the "IsInitialised" method as shown below:
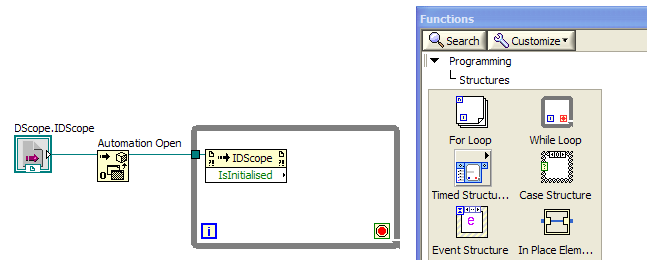
Figure 6: Adding a 'While loop'
- Wire the output of the "IsInitialised" method down to the red "stop condition" blob in the bottom right of the While Loop
- This stops the while loop when the dScope has initialised
- From the Function menu in the "Programming" -> "Timing" section, drag a "Wait (ms)" control into the while loop.
- Right click on the left hand side of the new "Wait" timer and from the "Create" option in the context menu, select "Constant"
- A little box should appear - type "100". This makes the While Loop wait 100ms every time around.
- You can now add more nodes to the output of the dScope Object so that you have something like the below:
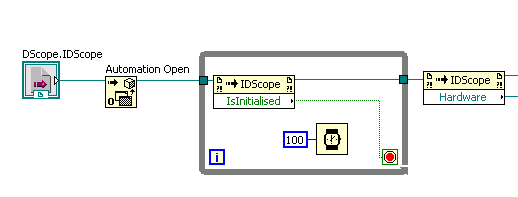
Figure 7: Output from the While loop
4) Automate dScope!
At this point you have access to the dScope and all the methods and properties of its automation interface are available to you. They are listed for you in the context menus of the controls you add and mostly will have clear text names which describe what they do. If not, each one is described in the dScope Automation manual which can be found in the dScope "Help" menu. Just search with the name of the method or property you want to know about. You access them in just the same way as you did for getting at the "IsInitialised" method.5) Stop the dScope and close the reference
...oh, and one more thing. When you're done, don't forget to close the reference. If you want to stop the dScope you can do it with the "ApplicationClose" method, but you could leave it open if you preferred. In any case, when you're done using the dScope Object that you opened with the "Automation Open" control, you should close it again with the "Close Reference" control, also from the "Function" menu in the "Connectivity" -> "ActiveX" section. This cleans up the references and memory used for the automation when you're done using it and will look something like the below:
Figure 8: Cleaning up

