dScope Series III Scripting and automation
IO Control from a dScope script using the Sealevel 8206FX
Overview
This scripting note describes using the Sealevel PLC-16 (Part number 8206FX) under the control of a script. The 8206FX digital I/O interface adapter provides 8 optically isolated inputs and 8 Form C relay outputs, which can be utilized for PC based control and industrial automation. For the purposes of this discussion, we will be using a script that provides a direct interface to control the relays and sense the inputs. The principles used here are applicable for controlling industrial processes while testing with the dScope etc.Installation
For the purposes of what follows, we will assume that the Sealevel PLC-16 has been installed from the supplied CD or with software downloaded from Sealevel. If this has been completed successfully, you should be able to use the "VB Test" program supplied by Sealevel to verify that it is working correctly.In order to be able to access the devices methods and properties from a VB script, a "wrapper" DLL has been written by Prism Sound. To use this, download the zip file which contains both the wrapper DLL and the script here. Extract the file "ActiveIOWrapper.dll" to any sensible location such as the default SeaIO installation folder. Next you will need to "register" it so that Windows will be aware of it and we will be able to access it directly. To do this, from the “start” menu, select “run”, then type in regsvr32 and the full path of the file "ActiveIOWrapper.dll" in quotes and press enter. The resulting command will look something like this:
regsvr32 "c:\program files\SeaIO\ActiveIOWrapper.dll" |
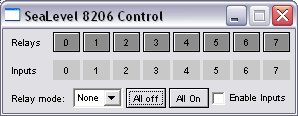
Once this has succeeded in registering the DLL, it is possible to control the device from a VB script. You can do this by copying the script from the downloaded zip file to any location (the dScope scripts/automation folder would be a good choice) and simply double clicking it. You don't have to have the dScope running, but the script does make use of the ScriptDlg.DLL that is part of the dScope installation so dScope will have to be installed. Running the script should give us a simple interface that looks like this:

The interface provides buttons for each relay on top row, and indicators for each input. In addition, a couple of simple modes are provided to allow the selection of only one relay on at a time (exclusive on) or only one relay off at a time (exclusive off). The interface is not the main focus of this scripting note. We are more interested in knowing how to use the features of the script in an automation script to control a process. To this end, we need to look into the script and see how to use the various parts.
Inside the script
The main initialisation of the SeaIO ActiveX control is done by the lines below:
'Setting up SeaLevel SeaIO ActiveX control via wrapper |
Here "SeaIO" is a variable that we are setting to be the name of our ActiveIOWrapper object. When we have initialised the hardware and given it a device number, we can then begin to access it. The command below will set the variable "strIOtype" to the ID of the attached device.
strIOtype = SeaIO.CardId |
Similarly the command below will set relay "0" to "on" (true). The last "0" sets whether this is a relative or absolute mode command. See the SeaIO documentation for more information about this as it pertains to the way in which the channels of the SeaIO device are addressed.
SeaIO.WriteBit 0, true, 0 |
In order to get information back from the Sealevel box, we use the command:
ibyte = SeaIO.ReadByte(0,1) |
This sets the value of the variable ibyte to an integer that, when presented in binary form, gives the state of the inputs. The first "0" defines the port that is used for the inputs. If we were to set this to "1" instead, we could read the state of the relays using the same syntax.
And that's basically it. Using these commands, we can make a script aware of when an input has sensed a voltage, and we can control relays. This opens up a lot of possibilities in process control and automation using the dScope III.
When we are finished with the SeaIO controller, we should terminate the control and set it to nothing as below.
' close down and set to nothing |
In summary, using the methods described here, we are able to control relays and sense inputs using a simple USB box that can be automated as part of a test set-up. This allows us to control a complex electro-mechanical production test from within a dScope automation script to make complex audio tests faster and more consistent.
Further Notes:
- The above description is for 32-bit operating systems and was performed with Windows XP.
- The Sealevel software is available in 64-bit versions, but the ActiveIOwrapper DLL is not (2014)
- USB 3 ports have been problematic with the 8206 - this may now have been resolved.

